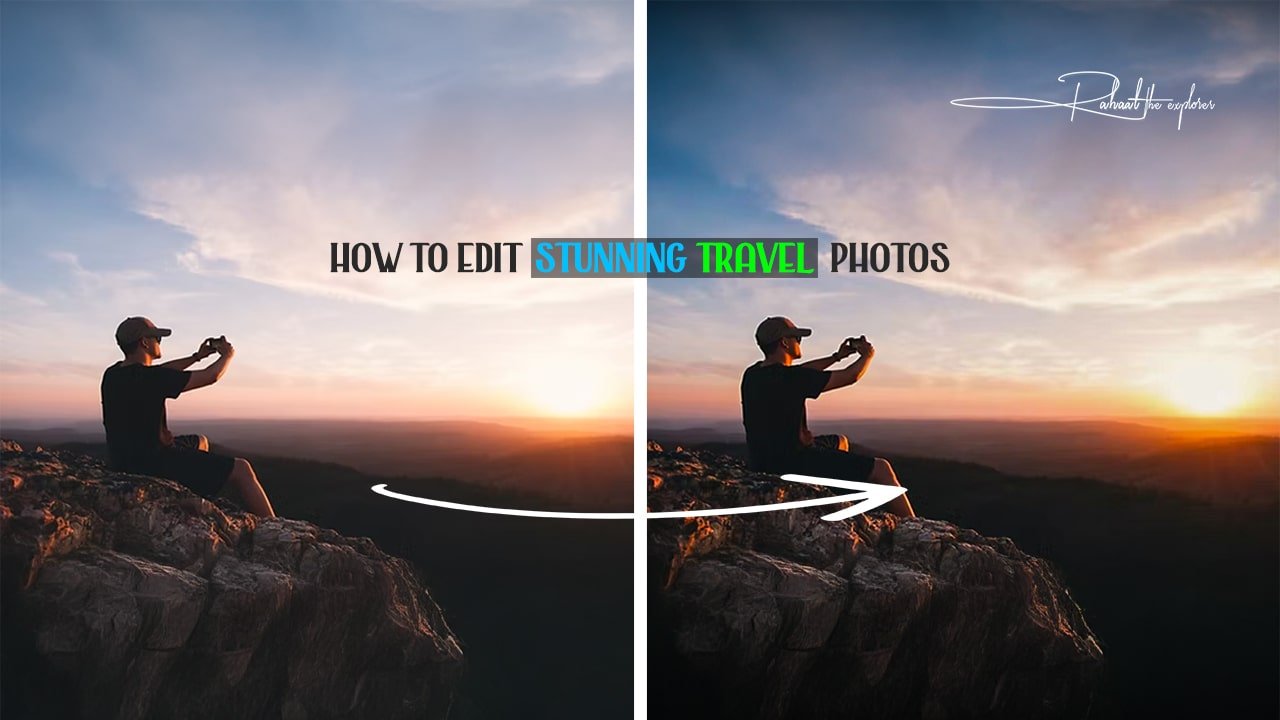

Travel photography is more than just capturing a moment. It is about telling a story, sharing emotions, and inspiring others to explore new destinations. With powerful cameras available in smartphones and professional gear, stunning travel visuals are now easier than ever to capture. However, even the best shot may need some enhancement to bring out the real beauty of the scene. That is where smart editing techniques come into play.
Editing allows you to improve lighting, correct colors, remove distractions, and create a polished look that stands out on social media and blogs. Whether you are a beginner or a frequent traveler looking to elevate your visual content, this detailed guide covers everything you need to know about travel photo editing tips to achieve professional-looking results.
Why Editing Travel Photos Matters
Travel photos often face uncontrolled challenges: harsh sunlight, unexpected shadows, fog, lens smudges, and crowded places. Editing brings life and accuracy back to your image by:
• Enhancing mood and atmosphere
• Balancing contrast and brightness
• Highlighting important elements
• Enhancing details and textures
• Unifying your personal style for branding
• Making the final image more engaging and memorable
The difference between a raw and edited travel photo is often the difference between a scroll-past and a save-worthy masterpiece.
Choose the Right Editing Tools
Before diving into editing techniques, choosing the right software is essential. Here are top tools used by photographers worldwide:
Desktop Software
• Adobe Lightroom Classic
• Adobe Photoshop
• Capture One
• Luminar Neo
• ON1 Photo RAW
These programs offer advanced color correction, layering options, and precise adjustment tools.
Mobile Apps
• Lightroom Mobile
• Snapseed
• VSCO
• PicsArt
• Afterlight
Perfect for editing on-the-go when traveling.
Choose tools that match your skill level and creative goals.
Start with the Basics: The Core Editing Pillars
Every professional edit begins with fundamental adjustments. These core settings transform the overall quality of the image.
Exposure Adjustment
Corrects brightness to make the image visually appealing. Avoid overexposing skies or losing shadow details.
Contrast
Enhances separation between light and dark areas, adding depth to landscapes or street scenes.
White Balance
Fixes unnatural colors caused by different lighting conditions. Use temperature and tint sliders to achieve a natural tone.
Highlights and Shadows
Bring back details in overly bright or dark areas. Clarity in skies, buildings, and faces often improves significantly here.
Clarity and Texture
Clarity enhances mid-tone contrast while texture sharpens finer details such as rocks, tree bark, and clothing patterns.
Vibrance and Saturation
Use vibrance for natural enhancements. Avoid pushing Saturation too far to prevent unrealistic colors.
These adjustments ensure a clean base for more creative editing later.
How to Make Your Travel Photos Pop
After basic corrections, elevate the image using these smart enhancements:
Add Depth with Local Adjustments
Selective tools like radial filters and brushes allow you to brighten key subjects or highlight leading lines.
Color Grading for Visual Style
Adjust specific color channels to evoke mood.
For example:
• Warm tones for beaches and sunsets
• Cooler tones for mountains and snow-capped peaks
Enhance Skies and Water
Use gradient filters to enhance clouds and reflection details without overprocessing.
Sharpen for Final Detail
Apply sharpening moderately to maintain clarity. Too much sharpening leads to grainy or unnatural results.
Noise Reduction
Reduce grain in low-light photos but keep details intact. Finding a balance is key.
Mastering these steps is central to good travel photo editing tips.
Editing Different Types of Travel Photos
Travel photographers encounter various environments. Each category has its own editing approach.
1. Landscape Photos
• Enhance contrast between the foreground and sky
• Use Dehaze tool for distant mountains
• Boost greens and blues for natural scenery
2. City and Architecture Photography
• Straighten perspectives to avoid leaning buildings
• Highlight reflections, lights, and geometric patterns
3. Portraits During Travel
• Soften skin gently
• Keep skin tone natural
• Brighten eyes to enhance expression
4. Food Photography While Traveling
• Increase texture and contrast
• Use selective highlights to enhance shine and freshness
Adapting editing techniques based on the scene is essential for success.
Storytelling Through Editing
A travel photo is more than a beautiful frame; it represents an experience. Editing should complement the story you want to tell.
Ask yourself:
• What emotion should this image evoke
• What was the atmosphere at that moment
• Which elements need more focus
Consistency in editing style makes your travel identity recognizable. A cohesive feed increases your brand value and audience trust.
Remove Distractions Professionally
Travel locations can be busy with people, poles, wires, or garbage in the frame. Remove distractions without compromising quality.
Tools to use:
• Healing Brush
• Clone Stamp
• Object Removal AI tools
This step helps maintain viewer focus on the subject and enhances overall composition.
Respect the Natural Look
Travel photography aims to represent the beauty of real places. Avoid unrealistic manipulation that changes natural geography or cultural authenticity.
A good rule:
Edit to enhance, not to mislead.
The beauty of travel lies in realism and connection.
File Formats: RAW vs JPEG
RAW files store more visual data, giving greater editing flexibility. Always shoot RAW for professional output.
JPEG compresses details but works fine for casual social media sharing.
For serious creators, RAW is highly recommended.
Backup and Workflow Organization
A smooth workflow saves time and reduces risk.
• Use SD card backups
• Organize images by date or destination
• Sync files with Cloud storage during trips
• Use presets to maintain a consistent visual style
Editing becomes faster and more enjoyable when files are well-managed.
The Power of Presets
Presets offer quick transformations. You can:
• Use professional preset packs
• Create your own presets from favorite edits
However, always fine-tune adjustments. Every location has different lighting conditions.
Presets should be a starting point, not the final edit.
Ethical Editing in Travel Photography
Responsible editing means:
• Avoid changing cultural elements
• Do not alter local identity
• Maintain historical and environmental accuracy
Photography should reflect respect for global diversity.
Mistakes to Avoid While Editing
These common errors can ruin otherwise beautiful photos:
• Over-saturation
• Excessive HDR effects
• Over-smoothing skin
• Over-sharpening landscapes
• Clipping highlights or shadows
• Misuse of filters
Subtlety creates elegance and professionalism.
Editing for Social Media and Blogs
Different platforms require optimized sizes and ratios:
• Instagram: 4:5 portrait or 1:1 square
• Pinterest: 2:3 ratio
• Facebook and Blogs: Horizontal (16:9 or 3:2)
Add watermarks to protect your work and strengthen branding.
Good editing also helps content perform better in Google Image search.
Travel Editing Workflow Example
- Import RAW file
- Apply lens correction
- Crop for composition
- Adjust exposure and contrast
- Fix white balance
- Enhance key colors
- Add texture and clarity
- Sharpen and reduce noise
- Remove distracting objects
- Apply finishing touches and export
Following a workflow ensures every image reaches full potential using the best travel photo editing tips.
Final Thoughts
Editing is an essential skill for every travel photographer. With the right tools and techniques, you can transform a good picture into an unforgettable one. From enhancing natural colors to creating unique moods through storytelling, post-processing allows your memories to come alive.
Whether you are editing images for Instagram, your travel blog, or your photography portfolio, remember that balance is key. Consistency builds your visual identity and keeps your audience coming back for more.
There is no limit to creative possibilities. Keep learning, practicing, and exploring. With strong editing skills, every journey becomes a story worth sharing.
Frequently Asked Questions (FAQs)
1. What apps are best for editing travel photos on a smartphone?
Lightroom Mobile and Snapseed are the best free options. VSCO is popular for stylish filters.
2. How do I keep my travel photos looking realistic after editing?
Apply gradual enhancements. Adjust saturation and clarity carefully to avoid unnatural results.
3. Should I shoot in RAW format while traveling?
Yes, if your device supports RAW. It gives more flexibility in exposure and color corrections.
4. How can I edit photos faster?
Use presets and batch editing, organize files properly, and develop a consistent editing workflow.
5. How often should I use HDR in travel editing?
Use it only when required, such as in high-contrast scenes. Too much HDR can reduce realism.